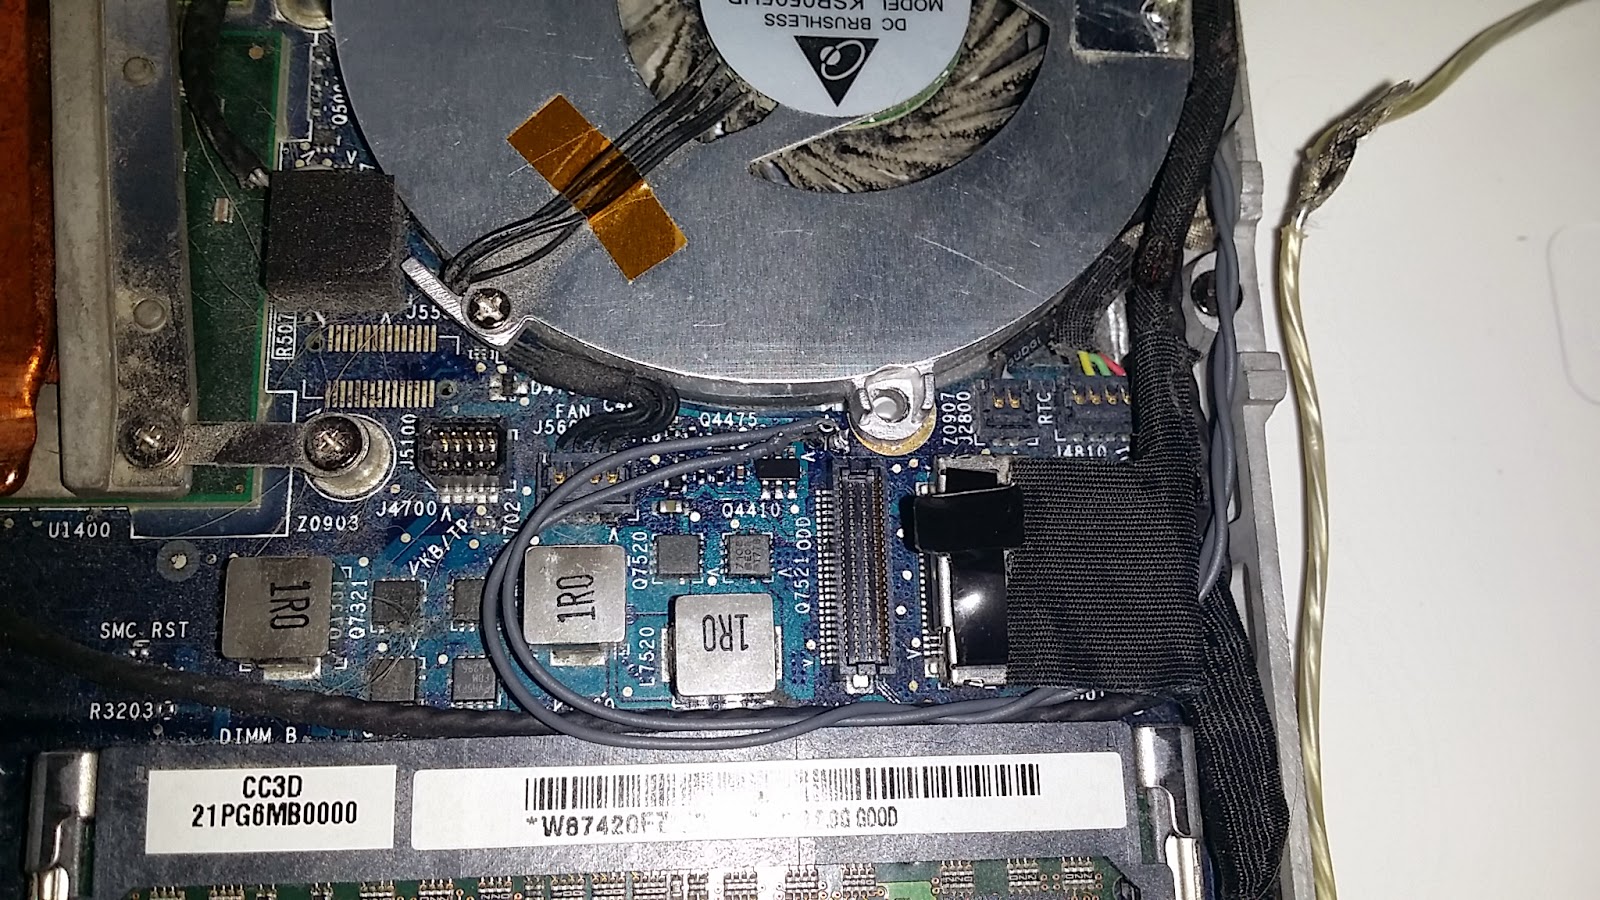
Well, I got my hands on a Macbook A1181 which was in fairly good condition but would not power up. I discovered that there are two pads on the logicboard which when connected, power the laptop on. So I went ahead and tried this and boom, the laptop powered on. I then proceeded to check the keyboard and noticed everything was working fine, the fault it would seem with this laptop was the power button on the top case. Rather than buy a brand new top case for just a faulty power button and being the tinkerer I am, I decided to put my engineering skills to the test. This hack will allow a Macbook with a faulty power button to be turned on using that same faulty power button (to keep aesthetics!)
You will need:
- Soldering iron
- Solder & flux
- Wiring
- Scissors
- Power button/switch (I used one from an old scrapped imac g5)
- Patience
- Good steady pulse!
Steps:
1.- Remove top case. (Search google/ifixit on how to do this)
2.- Take your power button and remove the bottom plastic connector so you have two explosed wires. Below is what the power button looks like. You can buy these cheaply on ebay or you may have one lying around. You won't need the plastic bits btw, only the power button and wiring.
3.- Take your extra wire and attach to each of the power button wires. (This is purely to make it longer and allow it to reach were we want it to go.Trust me this will allow you to manoeuvre much easier, the longer the wire the better.) Also, it helps if you twirl them together like a braid.
4.- Locate the power pads on your macbook. On the A1181 they are under the fan, they are in other locations on other macbooks.
5.- Solder one wire on one pad, and another on the other pad. It helps if you put some solder on the wires first and also apply some solder on the logicboard pads as well. Remember to use flux! See photo below
6.- Test out by pressing the power button to make sure your solder work is good. Make sure you haven't bridged the contacts with your solder work. Also, make sure you haven't bridged with any other pads on the logicboard. Another photo below showing the solder work and the attached power button.
7.- What you will need to do next is use some scissors to cut bits of PCB from your power button (white pictured above). Make sure not to cut any traces and don't interfere with the two wires soldered on the back. This is purely so you can fit the power button in the same area of your original Macbook power button.
8.- For this next part, haven't got any pictures but basically what you need to do is remove some of the plastics studs holding the keyboard in place to your top case in order to gain access to the original power button. It helps to bend the aluminium backwards.
9.- Once you have done this, you will need to remove the plastic membranes below the power button. I used small scissors to clip off this bit. As it doesn't work anyways, don't worry about doing this! One word of warning, make sure not to damage other traces or you may find other keys on your keyboard not working! This is required in order for you to be able to slide in the new power button you have just soldered to the logicboard.
10.- Slide in your new power button, you will need to get the positioning right so that it feels right when you are pressing it. I placed a bit of foam under the button and on top of the DVD drive to give it a nice bouncy effect and for it to sit flush when looking at it from the top. Remember the top lid fits tightly so route your wires somewhere out of the way.
And there you have it! Macbook with a new lease on life! Alternatively, you could just route the power button somewhere else on the laptop or have it dangling to one side or stick it on to a side or top lid....Or you could do something cool like put it on top of the apple Logo and have that be your power button... I wanted to keep it as "original" as possible hence why I routed it over to the original power button position.
Bostitch's Blog of Random
Monday, 1 September 2014
Saturday, 23 March 2013
How to fix volume problem on Amethyst iPig Speakal iPod Dock
Volume issues seem to be quite prevalent with these devices. Read on to understand how to fix the problem. This may also work with the iPanda, iBoo and other docks by Amethyst.
If you are experiencing the volume randomly going up to eardrum shattering levels or going down to a whisper for no reason at all.... it is because of the silly touch (over) sensitive volume controls on the device.
Disconnect the iPig and remove the 4 screws on the base of the unit. Be careful as you take the sub woofer out. Make sure not to pull too hard or you may sever the cable going to the PCB. Unplug the black cable from the sub woofer by pressing down on the small metal clip, this will give you more space to manoeuvre inside the iPig. Look inside the iPig and you will see two pink and white cables coming down from the area where the iPigs ears are. These cables connect to a PCB. Disconnect both of these cables and reconnect the black cable to your sub woofer.... then re-assemble the iPig.
Subscribe to:
Comments (Atom)


